Monday, Feb 1, 2016

Windows Server 2012 Hyper-V Failover Clustering - Part 3: Installation
In the previous post we have covered the overall architecture and the prerequisites for our highly available private cloud infrastructure. This time we will move on to the actual installation steps and show you how to set up and use the failover clustering feature in Windows Server 2012 R2.
Adding the Failover Clustering Feature
Failover clustering is available in both Standard and Datacenter editions of Windows Server 2012 R2. Generally speaking, clustering involves using two or more physical servers to create one “logical” server that exposes some functionality to users or applications. The members of the cluster (called nodes) are able to monitor each other and, if one of them goes down, its functionality “fails over” to other nodes without causing any disruption of service to the users.
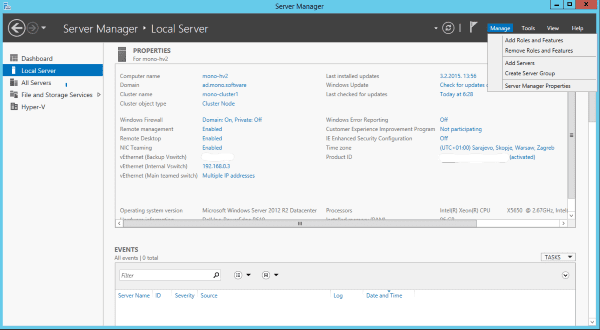
The first step in creating a Windows Server failover cluster is to add the Failover Clustering feature using Server Manager. Server Manager opens up automatically when you log on to your server. To add the feature, click on Manage - Add Roles and Features.

This starts the Add Roles and Features Wizard - click Next to go to the Select installation type page and select Role-based or feature-based installation option. Choose the server on the Select destination server page - in most of the scenarios it will be your local server on which the wizard is running. Click Next a couple of times, until you arrive on the Select features page and tick a box next to the Failover Clustering feature. A dialog box will be displayed, listing all components that will be installed as a part of this feature. Click the Add Features button to return to the Select features page. Click Next. The Confirm installation selections page will be displayed, giving you a chance to go back and make any changes if needed. Clicking the Install button will begin the actual feature installation process. After it completes, Failover Cluster Manager will be displayed in the Tools and Tasks sections of the Server Manager. This process must be completed on all cluster nodes.
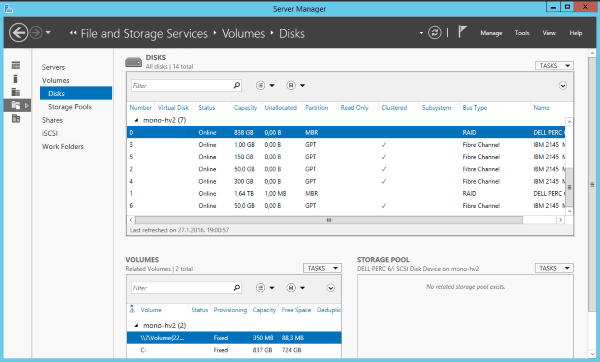
Now would be a good time to check if your shared disks are ready and initialized. The process will vary depending on the technology used (SAN, iSCSI, …), but you will generally want to use Server Manager - File and Storage Services. Since we are using a SAN, we can see and initialize all available volumes in the Volumes - Disks section.

Cluster Validation
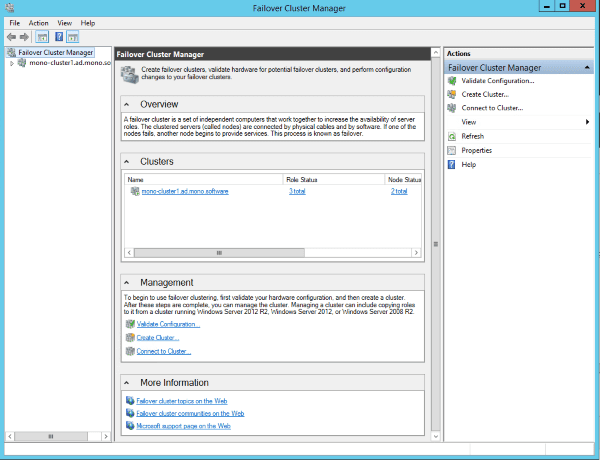
After the failover clustering feature is added, you need to validate the environment in which you will create a cluster. This is an essential step: Microsoft does not provide support unless all the hardware passes all the tests in the validation wizard. You can set up a cluster without validating the hardware, but chances are that you will experience problems sooner or later, so it does not make a lot of sense. So, go to the Failover Cluster Manager and click on the Validate Configuration link in the Management pane.

Perhaps the most common cause of validation failures is a virtual switch mismatch. If a Hyper-V host contains a virtual switch then every other host in the cluster must have a virtual switch with the same name.
Ater the validation tests succeed, you are ready to create a cluster. You can do it on any of the nodes. Selecting the Create Cluster link in the Management or Actions pane will start the Create Cluster wizard. It will ask you to select the servers that you want to have in the cluster. After that, you will have to specify your cluster’s name and IP address - of course, both must be unique on the network. We have entered mono-cluster1 and 10.80.35.140 - while IP addresses can be assigned by DHCP, I prefer to use a statically assigned IP addresses for our clusters. After the wizard finishes, it will display a Summary page with the confirmation information.
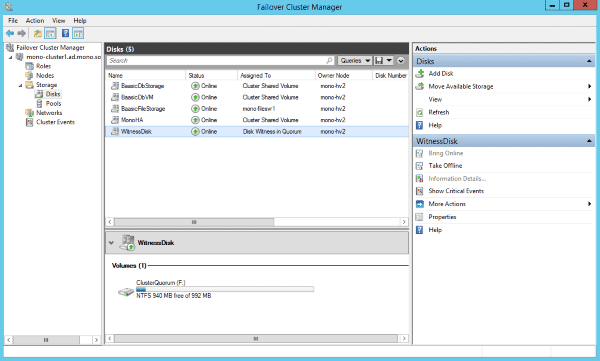
The wizard will automatically select the storage for your quorum. You can see the current state of your disks using the Failover Cluster Manager - expand the cluster node, go to the Storage node and click the Disks node. You can change the quorum configuration by right-clicking the cluster node, selecting More Actions, and choosing the Configure Cluster Quorum Settings option.
You can also add more disks at any time by clicking on the Add Disk option in the Actions pane of the Disks section. If you receive an error saying “No disks suitable for cluster disks were found”, make sure that your SAN is supported (validation process should report if it is not) and that your disks are initialized, visible on all nodes and have drive letter assigned to them. Alternatively, if you are using iSCSI targets, do not forget to configure the volumes at the iSCSI initiator on each node (Auto Configure button in the Volumes and Devices tab in the iSCSI Initiator Properties).
Cluster Shared Volumes
CSV (Cluster Shared Volumes) is a feature in Windows Server in which shared disks are concurrently accessible to all nodes within a failover cluster. You need to tell the cluster manager which storage should be used for the CSVs. In our scenario, we will use CSVs to hold disks for fault-tolerant virtual machines. As mentioned in the previous post, our standard arrangement involves something like this:
- SystemStorage volume will hold the system disk of our database server.
- DatabaseStorage will be used to store PostgreSQL databases.
- FileStorage will be exposed to the application servers as a central shared location where users can store and share files.
- Witness will be used for failover cluster quorum configuration.

System storage and DatabaseStorage will be assigned to cluster shared volumes. To enable a CSV on a disk, expand the Storage node and select the Disks node, select the cluster disk that you want to use as a CSV and click the Add to Cluster Shared Volumes link in the Actions pane. This will create a mount point for the CSV in the system drive. Depending on the number of your CSVs, you will end up with something like this:
- C:\ClusterStorage\Volume1
- C:\ClusterStorage\Volume2
- C:\ClusterStorage\VolumeNnn
Sooner or later, you will need to extend a volume. It is important to mention that you cannot simply use Disk Management to extend CSVs. This article explains the process in detail. To sum things up, you will need to execute the DiskPart utility and follow these steps:
- Run DiskPart from an elevated command prompt
- Type
rescan - Type
list volume - Type
select volume {enter volume number from output from #3 step} - Type
extend
File Server Role
After we finish configuring our CSVs, all that remains to be done is to set up a file server that provides a central location where files are shared for use by users or application. That is our FileStorage volume, as mentioned in the previous section. To set up high availability for a File Server role, right click on the Roles node in the Failover Cluster Manager and choose Configure Role. Choose File Server, and File Server for general use on the next page. You will need to enter the name that clients will use when accessing the clustered role and its IP address. We have entered mono-filesvr1 and 10.80.35.149 in the corresponding fields. After clicking on Next a couple of times, the role will get installed.
We can now create file shares on the failover cluster by right-clicking on the File Server role in the Roles section, and choosing Add File Share. The Select Profile page will present you with several options - choose SMB Share - Quick or SMB Share - Advanced. You will have to choose the share name location and name (in our example, it was baasicfiles), and enable the Enable Continous Availability option on the Other Settings page. You will also be able to configure access permissions (both NTFS and share permissions) on the Permissions page. After the wizard finishes, we will be able to access our file share via standard UNC path - in our example, it is
\\mono-filesvr1\baasicfiles.
Virtual Machine Role
You can now create fault-tolerant, highly available virtual machines in a very similar manner. Note that one of the most common misconceptions about failover clustering is that the act of setting up a failover cluster automatically makes all your virtual machines fault tolerant. This is not true - Failover Clustering feature requires you to manually specify the virtual machines that you wish to make fault tolerant. These virtual machines are treated as clustered roles. To add a new VM role, again click on the Configure Roles link in the Actions pane of the Failover Cluster Manager to launch the High Availability wizard. On a Select Role page choose the Virtual Machine role, and pick the virtual machines you want to be highly available. That’s all - as simple as that. However, please note that a selected VM should have its disk placed in a shared storage to use this feature - this topic will be covered in more detail in the next post.
We now have a fully functional Windows failover cluster. Next time I will describe how to set up the last key component of our infrastructure - a Linux virtual machine that runs PostgreSQL. Until than, please send us you comments and questions.